
Many Americans spend their leisure time doing different things, and one of the most loved outdoor activities is fishing. Fishing can be a source of entertainment as well as food. Anyone can go fishing, but not everyone can do it right. You will need to take some time to learn set up your gear to catch fish with ease.
In this blog, I will guide you on how to set up a fishing line for sea fishing. However, before we get to that, we will discuss all the items required for the saltwater fishing setup for beginners.
Common Tools Needed for Saltwater Fishing
Saltwater fishing is a little bit different from freshwater fishing, so be sure to buy the right gears. Some fishing reels do not work well in saltwater. Be sure to ask the seller if the reel works in saltwater before purchasing it. Here are the few things you will need to set up a fishing line for sea fishing.
- A fishing line dedicated to saltwater fishing
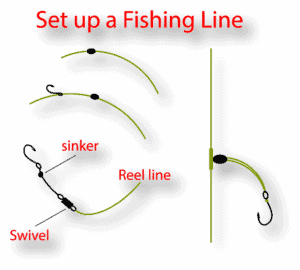
- A saltwater fishing hook
- Saltwater lures and baits
- A saltwater sinker
- Saltwater fishing reel and rod (make sure the rod is at least six feet long)
- Scissors and clippers
- Swivel
If you have everything required, here is how to assemble them together to catch some fish in saltwater.
Here You can find : Top 5 Best Braided Line for Saltwater
Setting Up the Fishing Line
Here are the steps to follow while setting up the line for saltwater fishing.
Locate the Reel Seat
The work of the reel seat is to secure the reel to the fishing rod. Here is how to locate it:
- Place the fishing rod from the bottom on your lap
- Find the “lip” toward the rod’s bottom and face it away from your direction.
- Locate the divot on the fishing rod, and that’s the reel seat.
Set the Fishing Reel to the Rod
The next step will be to attach the spinning or baitcaster reel you are using to the pole. Here’s how to go about it:
- Place the reel’s backside into the divot on the fishing rod
- While doing so, the handle of the reel will be on your right
- Slip the reel into its place
Attach the Reel to the Rod
- Locate the ring (black) above the fishing reel and twist it to the left
- Stop twisting the ring once it snugs
Line the Fishing Rod
The fishing reel usually comes with a line spooled. Therefore, the only thing you will need to do is line the pole. Here’s how to go about it:
- Get the line out of the reel from the end
- Thread the line the rod’s bottom eye
- Thread it all through to the top
- To make it easy, lay the pole on your lap as you continue to thread the line.
Add the Barrel Weight
- Pass the line through the barrel weight’s eye and pull it back to you.
Attach the Swivel
The swivel is used to keep the line from twisting while fishing. Casting a twisted line can lead to tangles leading to birdnesting or worse. That’s why it is crucial to add the swivel before setting up the line for saltwater fishing. Here’s how to go about it:
- Thread the fishing line through one of the swivel’s rings
- Create a knot.
Tie a Fisherman’s Knot
There are various types of fishing knots. The most basic one is easy to tie, and I will show you how to go about it in a bit. However, it may loosen up over time. If you want to learn how to tie more complex knots that will last longer, be sure to visit www.netknots.com. If you want to tie a basic angler’s knot, this is how to go about it:
- Pull the end of your line toward the standing fishing line about three inches
- Twist eight times
- By doing so, you will create a hole between the twists and the item
- Thread the fishing line through the created hole.
- Create tension by tugging each direction
- You should be able to see the hole in the final twists some distance from the item.
- Thread the line through the hole and tug it until it’s tense
- Tug the item along with the standing line to create a knot. Once the knot is created, the item will be set in place.
- Cut any excess lines with the scissors or clippers you brought.
If you find it difficult to make a fisherman’s knot, you can check out this video for visual aid. Sometimes it is easier to do something when you have a visual aid. Please note that the knot on the video is not the same as the one explained. Be sure to use the knot you find easy to tie. If you mess up your knot, you may lose the fish.
Add a Leader Line
Some people don’t see the importance of leader lines, but they are indeed crucial. The leader line (a shorter line on the hook before adding the line) has two major purposes:
- Helps you have a better bait presentation
- Provides your fishing line with protection against damage and breaks
I usually recommend using a leader line 99% of the time. Leader lines help avoid breaks, snags, and reduce line visibility. Reducing line’s visibility increases your chances of landing cautious fish like trout. Finally, leader lines also reduce the risk of twists with the swivel. Here’s how to add a leader line.
- Locate the spool
- From the other circle of the swivel, thread the end of the line
- Make a fisherman’s knot. Refer to the above steps to make a knot.
- Measure one foot from the swivel and cut the excess line with your scissors
Attach the Hook to the End of the Leader Line
- Thread the leader line through the eye of the fishing hook
- Make a fisherman’s knot after putting the line through the eye.
- Cut the excess line
Cast
After you have attached the fishing hook on the leader line, you should be ready to cast. There are two major casting techniques, and you can use whichever you will comfortable using. Most new anglers prefer casting spinning reels since it is easier to master compared to baitcasting. Attach your bait (can be worms, shrimp, or minnows) and cast. If you don’t know how to cast a spinning reel, here’s how to go about it:
- Hold the reel with your dominant hand and put the reel foot’s stem between your ring and middle finger. However, if the reel feels more comfortable between other fingers, you can always use the fingers that feel more balanced.
- Reel in the line until you get about 12 inches hanging off the rod tip.
- Make sure there are about ten inches between the lure and the rod tip. If the lure is too close or too far from the rod tip, it will hinder the casting.
- Use your index finger and pull off the roller with it. The line should move out of the spool without any hindrances.
- Use your non-dominant hand to flip the bail up over your head and release the line with the index finger. While doing so, your hand should be resting at an angle of about 45 degrees. Once you release the line, the lure will carry it to the target.
Your release point usually determines where the lure will land. Always try to be very accurate with your release time. If you are too late, the lure will probably fall on the riverbanks. If you are too early, the lure will just go high up, but will not go far either. That’s why you need to take your time to practice before heading out. Once you are good at releasing the line on time, you can now go out fishing.
Catch some Fish
Now that you know how to set up a fishing line for saltwater fishing, you can as well catch some fish. Before I wide up, I would like to insist that you should always get the right fishing gear for saltwater fishing.
Some fishing reels or rods are not great in saltwater, and you may end up regretting if you choose them. Take your time, do some research, and purchase fishing gears of the highest quality. If you have the right gear and follow the above steps, setting up a line for sea fishing will be a piece of cake.